Lists and libraries are two key components of the
Windows SharePoint Services 3.0 environment. They allow users to manage
documents by uploading them to libraries or to manage rows and columns
of information in a list, which is similar to a spreadsheet in many
ways. This section reviews the basic features of Windows SharePoint
Services 3.0 document libraries and lists. As the name suggests, a
document library is designed to store documents, and each document can
have metadata attached to it. This metadata allows a visitor to the
library to get a sense for when the document was added or modified, by
whom, and to better understand the purpose or content of the document in
question. A Windows SharePoint Services 3.0 list is essentially a
“spreadsheet on steroids” and is designed
to store data in much the same way as an Excel spreadsheet does. The
following sections provide an overview of the capabilities of these two
key components of Windows SharePoint Services 3.0.
Libraries in Windows SharePoint Services 3.0
Many users wonder what the
difference is between simply continuing to store their files in a file
share on a network server, keeping them on their local hard drives to
make sure they are close at hand, or emailing them to people when
needed. Windows SharePoint Services 3.0 document libraries offer a
variety of features that have proven to be useful to a wide range of
users and projects and that empower the site administrators to customize
the storage and collaborative features of the library and enhance user
productivity. Some of the advantages provided by a SharePoint document
library include the following:
The
administrator of a document library can customize who can add, modify,
and delete documents in a document library, or just read them. Versioning
can be turned on for a document library that keeps a complete copy of
previous versions of the documents for reference or recovery purposes. Alerts
can be set on a document within the library or for the entire library
so the user receives an email notification if a document is modified,
added, or deleted. Documents
can be checked out, and the name of the person who has the document
checked out can be listed in the library, so that other users can’t
modify the document and know who has it reserved. A template can be stored in the document library that can be used to create a new document in the library. Metadata
can be added to a document library that enables users to better
describe what the document contains, by, for example, clarifying which
client it belongs to, key words in the document, or pretty much any
other kind of textual or numerical information. Views
can be created that group documents by certain criteria, sort them by
any of the columns in the library, or only display documents that meet
certain criteria. The
library can be searched for text contained within the document, a
feature often not available on a corporate network. In addition, the
metadata associated with a document can be searched. If
the organization decides on certain standards for the customization of a
document library, it can create a template that can be used in other
sites.
In Windows SharePoint Services 3.0, the standard document libraries provided are as follows:
Document library Form library Wiki page library Picture library
The
following section walks through the main features of a document
library. Form libraries are designed to store InfoPath-based forms,
whereas wiki page libraries contain pages that provide wiki-like
functionality (multiple people can modify the content and changes are
tracked) and the picture library is designed to store and manage graphic
file types.
A Tour of a Document Library
To access a document library, a
user first needs to have a level of privileges that allows access to the
site that houses the library, and also have privileges to open the
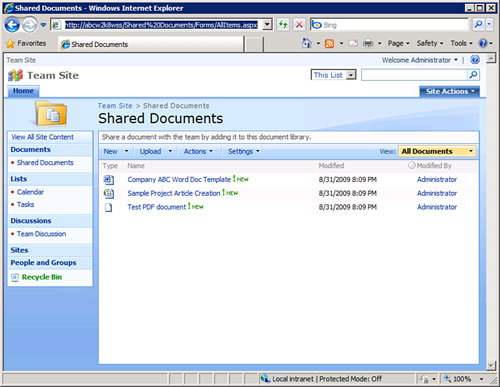
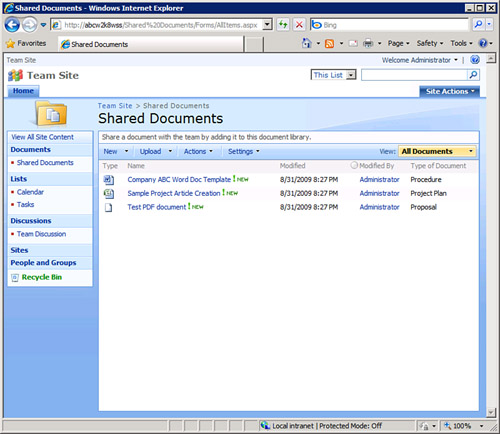
library. Figure 1 shows the AllItems.aspx
view of a document library (note the uniform resource locator [URL] in
the address bar of Internet Explorer in the figure). Note that many of
the features on this web page are similar to the home page of the site
itself, including the look and feel of the home page and the Quick
Launch area on the left side, but it now displays library-specific data
in the main body of the page, where three documents are visible that
were uploaded to this sample library. Note that the document titled
“Test PDF Document” does not have the PDF icon assigned to it, which is
expected. This PDF icon file needs to be placed in the proper directory,
and the appropriate XML file edited, for the icon to appear.
Following is a summary
of the features offered in the different toolbar menus in a document
library. These tools allow the user to perform a great number of tasks
quickly and easily within the library, from adding new documents from a
template, to uploading one or multiple documents, to connecting to Outlook, to adding columns, to exporting to Microsoft Access.
The New Menu
The New menu allows a user with
the Add Items permission for lists and libraries to launch a template
document that can be modified and saved by default back to the library,
or to create a New Folder in the document library. Other users won’t see
this option on the toolbar.
The Upload Menu
The Upload menu offers the
Upload Document option, and if the appropriate version of Office is
installed, the Upload Multiple Documents option is provided. Only users
with the Add Items permission for the library will see this menu on the
toolbar. If a user chooses to Upload Multiple Documents, an interface
allows multiple documents from within the same folder to be uploaded.
Note that whole folders cannot be checked, nor can files from multiple
folders be uploaded at once.
The Actions Menu
The Actions menu offers a
number of different and powerful options and is context sensitive based
on the privileges of the logged-on user. This menu is visible to all
users who can access the document library, but users with lesser
privileges will have fewer options available to them. The following list
gives a brief overview of the features provided:
Edit in Datasheet—
When a user selects this option, the contents of the document library
are displayed in a spreadsheet fashion, assuming the appropriate Office
components are installed on the computer. Generally, the Datasheet view
is used to rapidly enter recurring text for columns of metadata that are
editable. There are also additional tools available in Datasheet view.
To access these additional tools, click the arrow on the right side of
the document library to expand the tasks pane. This tasks pane includes
the following tools as indicated by icons in the upper portion of the
tasks pane: Cut, Copy, Paste, Undo, Sort, Remove Filter/Sort, and Help.
Below these tools in the Office Links section of the tasks pane, the
user can access additional tools: Track This List in Access, Export to
Access, Report with Access, Query List with Excel, Print with Excel,
Chart with Excel, and Create Excel Pivot Table Report. Using the Print
with Excel option is also handy because printing directly from Internet
Explorer doesn’t provide much flexibility. Note
Make sure that the
standard desktop is compatible with Datasheet view, or users will be
filing help desk tickets when they try to access this feature. The
following are requirements for Datasheet view:
Per Microsoft,
Office 2007 must be installed on your computer. However, testing with
Office 2003 showed normal functionality, but with the “old” tasks pane
from SharePoint 2003. Install
the Microsoft Office Access Web Datasheet Component that is included
with the 2007 Office release on your computer. This is also a
requirement for Office 2003, and is found on the Office 2003
Professional CD.
Open with Windows Explorer—
When this option is selected, a separate Explorer window opens, which
provides standard Explorer functionality, such as Open, Edit, New,
Print, Copy, and Paste. The user’s rights in the document library are
still respected, so right-clicking an item and deleting it doesn’t
delete it from the library if the user doesn’t have appropriate rights. Connect to Outlook—
This option allows the user to connect a SharePoint library to Outlook
2007. This is very handy if a user wants to take the contents of the
library offline in Outlook so she can access it when not connected to
the network or the Internet. Export to Spreadsheet—
Similar to the commands available from the tasks pane that is available
in Datasheet view, the Export to Spreadsheet option opens Excel 2007
(or Excel 2003). View RSS Feed— When selected, this option opens the listfeed.aspx page, as shown in Figure 2,
which gives the user a chance to see what the content of the document
library will look like when accessed through the RSS feeder
functionality in Windows SharePoint Services 3.0. If the user clicks on
the Subscribe to This Feed link in Internet Explorer 7 or 8, he will be
prompted for the following information in an Internet Explorer window:
name for the feed, folder to create the feed in, and the option to
create a new folder.
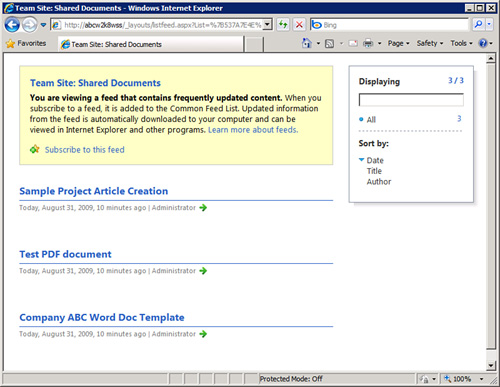
Caution
Note that the View RSS Feed functionality is not supported in Internet Explorer 6—only in Internet Explorer 7 or 8.
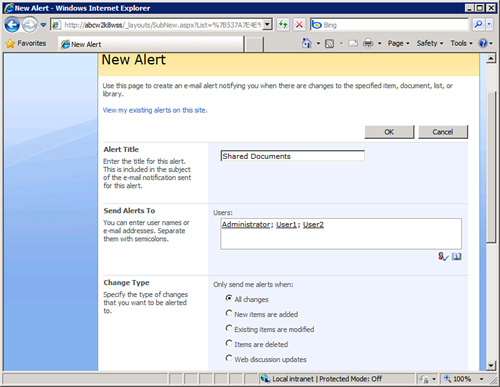
Alert Me— Windows SharePoint Services 3.0 can send an email alert if certain conditions are met in a document library. As shown in Figure 3,
the alerting feature allows the user to add multiple names to the alert
or even distribution lists. The user can specify the conditions that
will send them an alert, such as all changes, new items are added, and
other conditions such as only if someone else changes a document created
by me. The email alert can be sent immediately, in a daily summary, or
even in a weekly summary at a given day and time.
The Settings Menu
The Settings menu is only
available to site visitors with Manage Lists permissions. This menu
offers the Create Column, Create View, and Document Library Settings
options. Figure 4 shows the listedit.aspx page that will open if the Document Library Settings choice is selected. By glancing at the options on this page, it is clear
that many different types of changes can be made from the Document
Library Settings page, including versioning, permissions, workflows,
RSS, creating new columns, editing existing columns, and, barely visible
at the bottom of Figure 4, creating or modifying views.
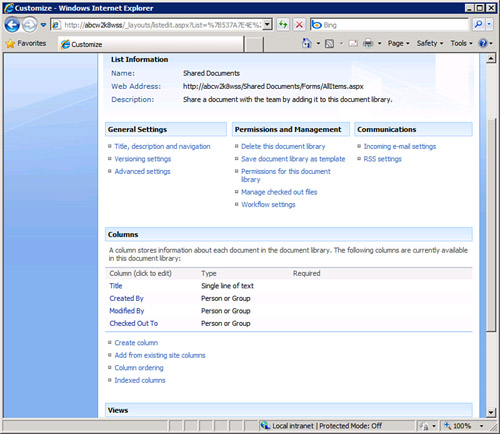
Figure 5 shows the previously viewed document library after a new column titled Type of Document has been added. Compare this view to Figure 1
to see the difference. By adding a column, the administrator provides
additional metadata about the different documents, to help visitors more
quickly find the document they require.
The View Menu
The View menu on the right edge
of the toolbar is available to members of all groups, but only users
with Manage Lists permissions can add or remove public views of a list
or library. Standard views include the following:
All Documents—
The All Documents view is a standard view that provides the user with
basic information about the documents stored in the library: Type, Name,
Modified, and Modified By. The All Documents view can be modified by an
administrator with sufficient privileges. Explorer—
The Explorer view (which is different from the Open with Windows
Explorer action) displays the contents of the document library in an
Explorer-type environment, where certain standard commands are
available, and right-clicking on an item brings up standard Explorer
commands. Modify This View— This option is only available to users with Manage Lists permissions. Create View— As with the preceding option, this is only available to users with Manage Lists permissions.
Understanding the Edit Menu Options in a Document Library
In addition to the
other library features reviewed in the previous sections, additional
interactions with documents stored in a document library are possible
through the Edit menu, which is accessed by hovering over the document
name, as shown in Figure 6.

These options reflect an
additional level of power and functionality offered by a document
library. A brief summary of each of the standard Edit menu items is as
follows:
View Properties—
A variety of tools are made available when View Properties is selected
from the drop-down menu, including Edit Item, Delete Item, Manage
Permissions, Manage Copies, Check In, Workflows, and Alert Me. The user
must have sufficient permissions to see these options. Edit Properties—
This option displays the metadata associated with the item, and allows
the user, if he has the appropriate permissions, to modify this data. Manage Permissions—
A user with the Manage Lists permissions is able to use this tool to
change which permissions different Windows SharePoint Services 3.0 users
or groups have to the document. For example, a human resources document
library manager might change permissions on certain documents to Read
for the Members group, even though, by default, they can modify or
delete other documents in the library. Edit in Microsoft Application—
Windows SharePoint Services 3.0 will search for the association of the
file type to an application, and if it is a Microsoft application, the
application will be opened, allowing editing of the document. Delete— This moves the document to the Recycle Bin for the document library if the user has sufficient permissions. Send To— As shown in Figure 35.15,
the default options are Other Location, E-Mail a Link, Create Document
Workspace, and Download a Copy. The Other Location option actually makes
a copy of the document in another SharePoint document library that is
defined in the Advanced Settings for the library accessible from the
Document Library Settings page. Emailing a link shares the document with
another user without a full copy of the document being sent to that
user. A document workspace is a SharePoint site that contains a copy of
the document and encourages collaboration on a specific document.
Downloading a copy allows the user to specify a location on their
computer where a copy will be saved. Check Out—
This is widely considered one of the more important features of a
document management system. Administrators can now force a checkout
before editing can take place from the Versioning Settings accessible
from the Document Library Settings page. A user can check out a document
and save it to a SharePoint Drafts folder in the My Documents folder.
If the user chooses this option, she can edit the document even if she
is offline and can’t connect to the SharePoint 2007 server. A user can
check out a document simply to make sure no one else modifies it, and if
they forget, an administrator can force a check-in later from the
Manage Checked Out Files link on the Document Library Settings page. Unpublish This Version—
Versioning needs to be configured in this library to allow major and
minor drafts for this option to be available. With these versioning
options available, “unofficial” minor draft versions of documents can be
posted to the library that may still be in need of editing, or
published as major drafts that should be considered complete. The
unpublish option allows a user to revert the status of the document to
minor from major. Note that a document library administrator can choose
to hide minor versions of documents from users with only Read access to
the library. Version History—
If versioning is turned on for a document library, every time a
document is changed and saved, SharePoint keeps the entire previous
version of the document. Published versions are considered to be major
versions, whereas unpublished versions are considered minor versions.
The number of each type of version retained can be set by the
administrator. As an example, a site administrator might decide to allow
both major and minor versions. The administrator may choose to keep 10
major versions as well as keep the minor versions for only the last 2
major versions. This granularity in version history allows for some
rollback and history of the most recent major versions, but discards
minor versions for all other major versions. When a user chooses Publish
a Major Version, he can then add comments that can describe the changes
made. Workflows—
One or more workflows can be created in a document library in Windows
SharePoint Services 3.0. This option is only available if a workflow has
been
created by an administrator for the document library. Only one template
is available, however: the Three-state workflow. This assigns states to
a document based on the values in a column that the administrator
chooses (such as draft, final, approved, or in review). When the first
assignee completes their review, it is set to the middle state, and when
the next person reviews it, it is set to the final state. Although
limited, this workflow gives Windows SharePoint Services 3.0 users an
understanding of the workflow process. Alert Me—
This process was covered previously with reference to a whole document
library. If selected for a document or file, the alert will only execute
if the document or file is changed.
Summarizing the Challenges and Benefits of Document Libraries
As the previous
sections summarized, there are many, many features and options available
in a document library. Although it only takes a few minutes to
understand the basic processes of uploading and checking out documents,
it can take many months of using and managing document libraries to
master the more complex features (some of which, such as content types,
aren’t even presented in this section because of space constraints).
Because document libraries are such a critical component of the Windows
SharePoint Services 3.0 ecosystem, ample time should be given to testing
them, exploring the different features, and coming up with some
standards that meet the needs of the user community.
For example, an organization
that has never used Windows SharePoint Services 3.0 before shouldn’t
immediately try to leverage all of the advanced features of a document
library, such as minor and major drafts, item-level security, RSS feeds,
and complex columns (such as lookup or calculated columns). Instead,
the organization should add one or two new columns to a document library
that meet the needs of the user group (such as a column titled Client
Name or Part Number), create a custom view, and then provide some
training to the pilot users. The best way to promote the adoption of
SharePoint is to limit the complexity, add value to the users, and
provide training.
|